基本概念
名称由来:Tomcat最初是由Sun的软件构架师詹姆斯·邓肯·戴维森开发的。后来他帮助将其变为开源项目,并由Sun贡献给Apache软件基金会。由于大部分开源项目O’Reilly都会出一本相关的书,并且将其封面设计成某个动物的素描,因此他希望将此项目以一个动物的名字命名。因为他希望这种动物能够自己照顾自己,最终,他将其命名为Tomcat(英语公猫或其他雄性猫科动物)。而O’Reilly出版的介绍Tomcat的书籍(ISBN 0-596-00318-8)[1]的封面也被设计成了一个公猫的形象。而Tomcat的Logo兼吉祥物也被设计成了一只公猫。
Apache(Apache HTTP Server)只支持静态网页,但像php,cgi,jsp等动态网页就需要Tomcat来处理。 Tomcat是由Apache软件基金会下属的Jakarta项目开发的一个Servlet容器
Apache是web服务器,Tomcat是应用(java)服务器catalina
Apache HTTP Server负责接受所有来自客户端的HTTP请求,然后将Servlets和JSP的请求转发给Tomcat来处理。Tomcat完成处理后,将响应传回给Apache,最后Apache将响应返回给客户端。于是在tomcat中运行Java程序也就是Servlet的那个模块因为体现了tomcat最核心特点而引起了大家的重视,而这个模块的名字叫做Catalina。Catalina是太平洋中靠近洛杉矶的一个小岛。因为其风景秀丽而著名。曾被评为全美最漂亮的小岛。server和serviceserver:n,服务器; 侍者; 上菜用具; 发球者service:n,服役; 服务,服侍; 服务业; 维修服务
在日常软件开发中,server应该是一个部署的项目,一个application,而service是server提供的很多服务中的一个,一个是容器,一个是容器里面的东西。
总体架构
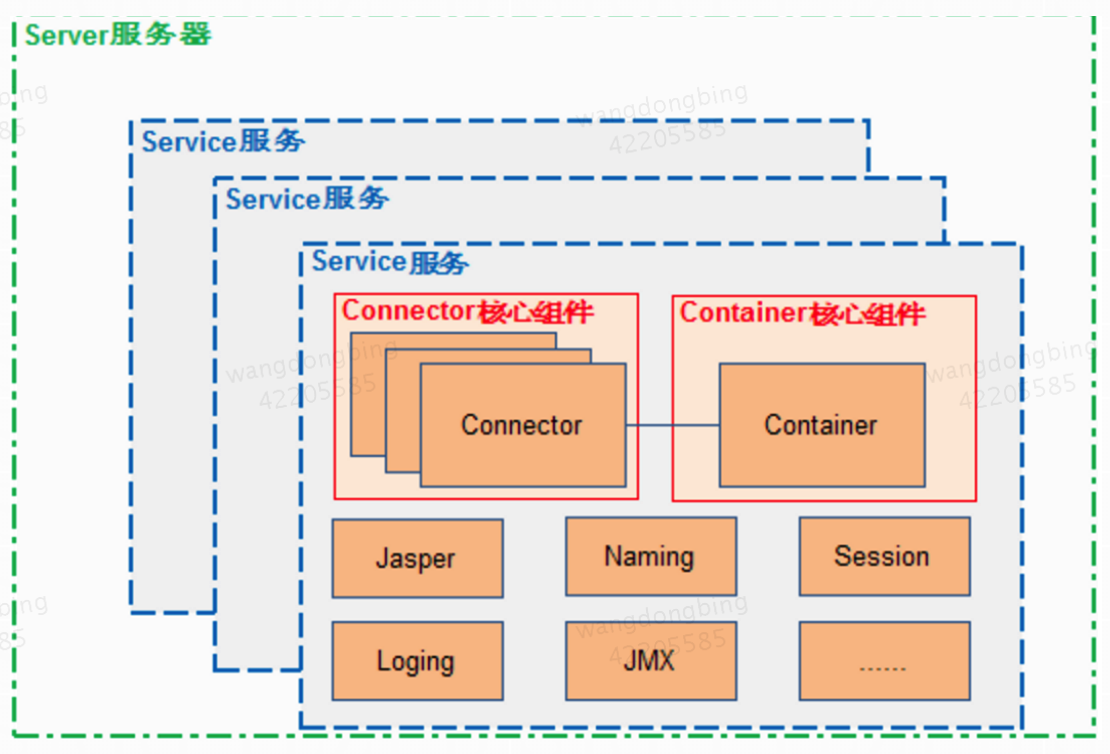
从上图中可以看出 Tomcat 的心脏是两个组件:Connector 和 Container,Connector 组件是可以被替换,这样可以提供给服务器设计者更多的选择,因为这个组件是如此重要,不仅跟服务器的设计的本身,而且和不同的应用场景也十分相关,所以一个 Container 可以选择对应多个 Connector。多个 Connector 和一个 Container 就形成了一个 Service,Service 的概念大家都很熟悉了,有了 Service 就可以对外提供服务了,但是 Service 还要一个生存的环境,必须要有人能够给她生命、掌握其生死大权,那就非 Server 莫属了。所以整个 Tomcat 的生命周期由 Server 控制。
Service
我们将 Tomcat 中 catalina模块比作一个部门的话,小组leader负责对外交流,控制需求,审核需求,相当于Connector, 而小组组员则负责完成需求,相当于Container,那么他们共同组成的Tema1就是一个servcie。可以类比下,在我们平常工作中,是 Service 将它们连接在一起,共同组成一个Team。
说白了,Service 只是在 Connector 和 Container 外面多包一层,把它们组装在一起,向外面提供服务,一个 Service 可以设置多个 Connector,但是只能有一个 Container 容器。这个 Service 接口的方法列表如下: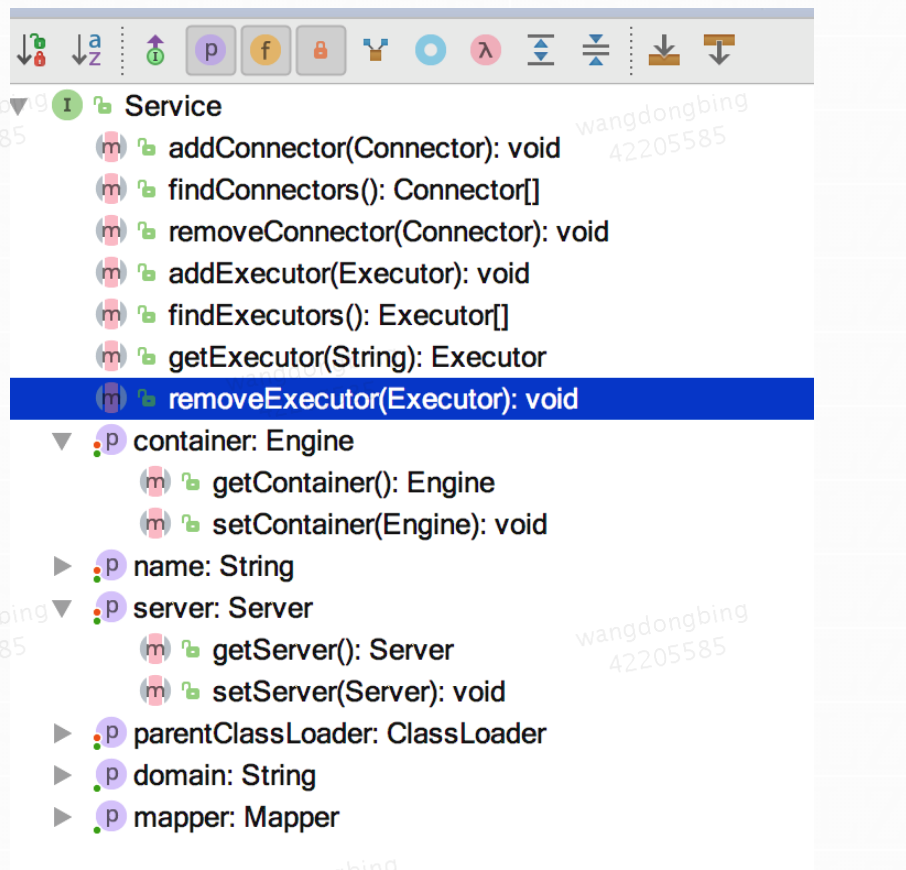
从 Service 接口中定义的方法中可以看出,它主要是为了关联 Connector 和 Container,同时会初始化它下面的其它组件,注意接口中它并没有规定一定要控制它下面的组件的生命周期。所有组件的生命周期在一个 Lifecycle 的接口中控制,这里用到了一个重要的设计模式,关于这个接口将在后面介绍。
Tomcat 中 Service 接口的标准实现类是 StandardService 它不仅实现了 Service 接口同时还实现了 LifecycleBase 接口,这样它就可以控制它下面的组件的生命周期了。StandardService 类结构图如下: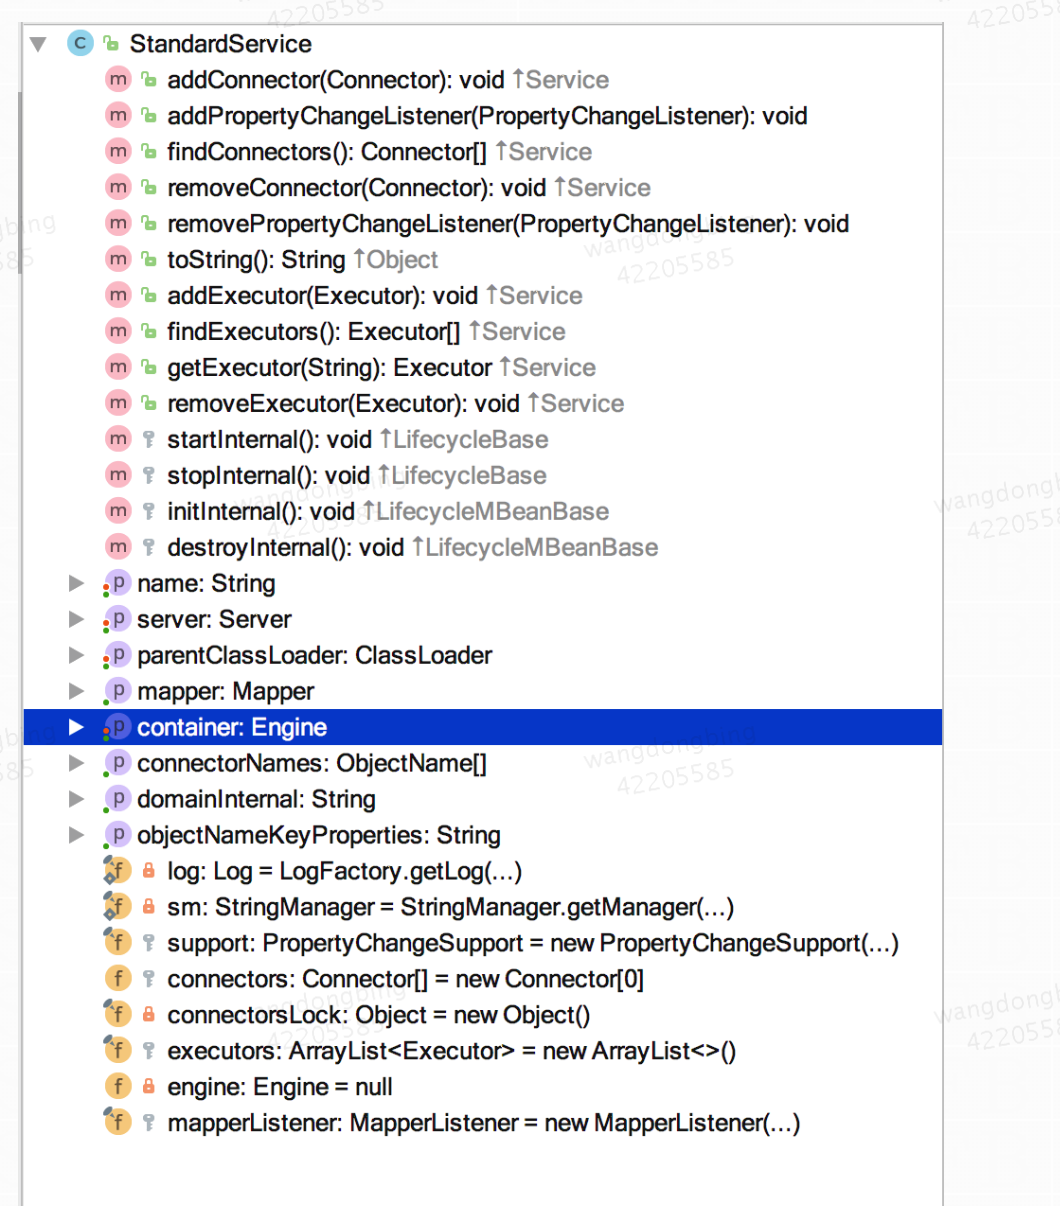
从上图中可以看出除了 Service 接口的方法的实现以及控制组件生命周期的 Lifecycle 接口的实现,还有几个方法是用于在事件监听的方法的实现,不仅是这个 Service 组件,Tomcat 中其它组件也同样有这几个方法,这也是一个典型的设计模式,将在后面介绍。
下面看一下 StandardService 中主要的几个方法实现的代码,下面是 setContainer 和 addConnector 方法的源码:1
2
3
4
5
6
7
8
9
10
11
12
13
14
15
16
17
18
19
20
21
22
23
24
25
26
27
28
29
30
31
32
33
34
35
36
37
38
39
40public void setContainer(Engine engine) {
Engine oldEngine = this.engine;
if (oldEngine != null) {
oldEngine.setService(null);
}
this.engine = engine;
if (this.engine != null) {
this.engine.setService(this);
}
if (getState().isAvailable()) {
if (this.engine != null) {
try {
this.engine.start();
} catch (LifecycleException e) {
log.warn(sm.getString("standardService.engine.startFailed"), e);
}
}
// Restart MapperListener to pick up new engine.
try {
mapperListener.stop();
} catch (LifecycleException e) {
log.warn(sm.getString("standardService.mapperListener.stopFailed"), e);
}
try {
mapperListener.start();
} catch (LifecycleException e) {
log.warn(sm.getString("standardService.mapperListener.startFailed"), e);
}
if (oldEngine != null) {
try {
oldEngine.stop();
} catch (LifecycleException e) {
log.warn(sm.getString("standardService.engine.stopFailed"), e);
}
}
}
// Report this property change to interested listeners
support.firePropertyChange("container", oldEngine, this.engine);
}
这段代码很简单,其实就是先判断当前的这个 Service 有没有已经关联了 Container,如果已经关联了,那么去掉这个关联关系—— oldContainer.setService(null)。如果这个 oldContainer 已经被启动了,结束它的生命周期。然后再替换新的关联、再初始化并开始这个新的 Container 的生命周期。最后将这个过程通知感兴趣的事件监听程序。
1 | public void addConnector(Connector connector) { |
上面是 addConnector 方法,这个方法也很简单,首先是设置关联关系,然后是初始化工作,开始新的生命周期。这里值得一提的是,注意 Connector 用的是数组而不是 List 集合,这个从性能角度考虑可以理解,有趣的是这里用了数组但是并没有向我们平常那样,一开始就分配一个固定大小的数组,它这里的实现机制是:重新创建一个当前大小的数组对象,然后将原来的数组对象 copy 到新的数组中,这种方式实现了类似的动态数组的功能,这种实现方式,值得我们以后拿来借鉴。
Server
在我们日常开发中,一个小组组成了一个service,那么小组又依赖于什么存在呢?当然是部门或者公司,我们姑且此处假定为部门,试想一下,部门都不存在了,那我们这个小Team还会存在吗?皮之不存毛将焉附!
显然,servcie需要一个赖以生存的地方,需要一块可以生长的土壤,那么这块土壤就是Server!当然server提供了可以给很多service提供这块土壤,类比我们工作中,一个部门有着很多很多小的Team!
Server 要完成的任务很简单,就是要能够提供一个接口让其它程序能够访问到这个 Service 集合、同时要维护它所包含的所有 Service 的生命周期,包括如何初始化、如何结束服务、如何找到别人要访问的 Service。
它的标准实现类 StandardServer 实现了上面这些方法,同时也实现了LifecycleMBeanBase 类,下面主要看一下 StandardServer 重要的一个方法 addService 的实现:1
2
3
4
5
6
7
8
9
10
11
12
13
14
15
16
17
18public void addService(Service service) {
service.setServer(this);
synchronized (servicesLock) {
Service results[] = new Service[services.length + 1];
System.arraycopy(services, 0, results, 0, services.length);
results[services.length] = service;
services = results;
if (getState().isAvailable()) {
try {
service.start();
} catch (LifecycleException e) {
// Ignore
}
}
// Report this property change to interested listeners
support.firePropertyChange("service", null, service);
}
}
从上面第一句就知道了 Service 和 Server 是相互关联的,Server 也是和 Service 管理 Connector 一样管理它,也是将 Service 放在一个数组中,后面部分的代码也是管理这个新加进来的 Service 的生命周期。
组件的生命线“Lifecycle”
前面一直在说 Service 和 Server 管理它下面组件的生命周期,那它们是如何管理的呢?
Tomcat 中组件的生命周期是通过 Lifecycle 接口来控制的,组件只要继承这个接口并实现其中的方法就可以统一被拥有它的组件控制了,这样一层一层的直到一个最高级的组件就可以控制 Tomcat 中所有组件的生命周期,这个最高的组件就是 Server,而控制 Server 的是 Startup,也就是您启动和关闭 Tomcat。
下面是 Lifecycle 接口的类结构图: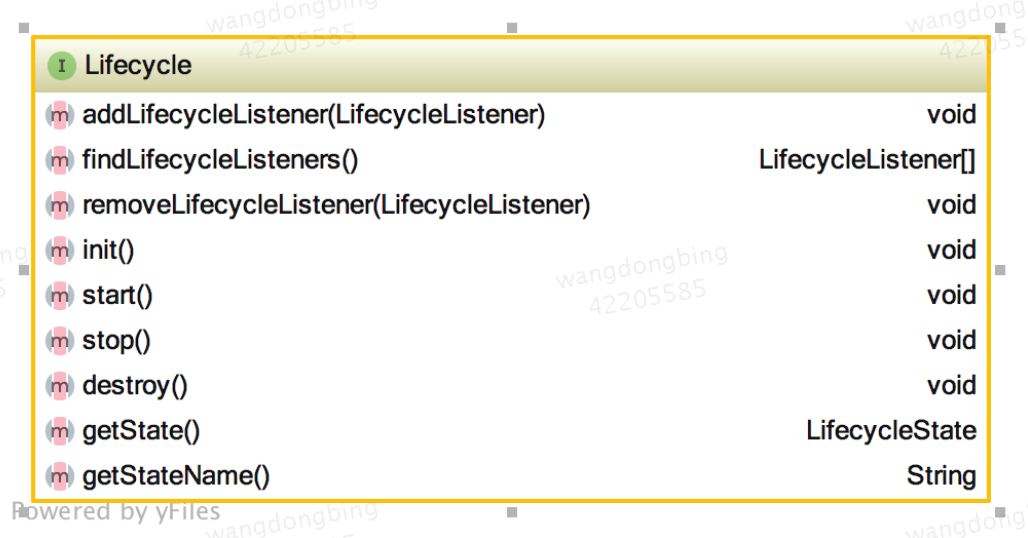
除了控制生命周期的 Start 和 Stop 方法外还有一个监听机制,在生命周期开始和结束的时候做一些额外的操作。这个机制在其它的框架中也被使用,如在 Spring 中。关于这个设计模式会在后面介绍。
Lifecycle 接口的方法的实现都在其它组件中被调用,就像前面中说的,组件的生命周期由包含它的父组件控制,所以它的 Start 方法自然就是调用它下面的组件的 Start 方法,Stop 方法也是一样。如在 Server 中 Start 方法就会调用 Service 组件的 Start 方法。
Server 的 Start 方法代码如下:1
2
3
4
5
6
7
8
9
10
11protected void startInternal() throws LifecycleException {
fireLifecycleEvent(CONFIGURE_START_EVENT, null);
setState(LifecycleState.STARTING);
globalNamingResources.start();
// Start our defined Services
synchronized (servicesLock) {
for (int i = 0; i < services.length; i++) {
services[i].start();
}
}
}
监听的代码会包围 Service 组件的启动过程,就是简单的循环启动所有 Service 组件的 Start 方法,但是所有 Service 必须要实现 Lifecycle 接口,这样做会更加灵活。
Server 的 Stop 方法代码如下:1
2
3
4
5
6
7
8
9
10protected void stopInternal() throws LifecycleException {
setState(LifecycleState.STOPPING);
fireLifecycleEvent(CONFIGURE_STOP_EVENT, null);
// Stop our defined Services
for (int i = 0; i < services.length; i++) {
services[i].stop();
}
globalNamingResources.stop();
stopAwait();
}
它所要做的事情也和 Start 方法差不多。
Connector 组件
Connector 组件是 Tomcat 中两个核心组件之一,它的主要任务是负责接收web服务器的发过来的 tcp 连接请求,创建一个 Request 和 Response 对象分别用于和请求端交换数据,然后会把产生的 Request 和 Response 对象传给处理这个请求的线程,处理这个请求的线程就是 Container 组件要做的事了。
由于这个过程比较复杂,大体的流程可以用下面的顺序图来解释: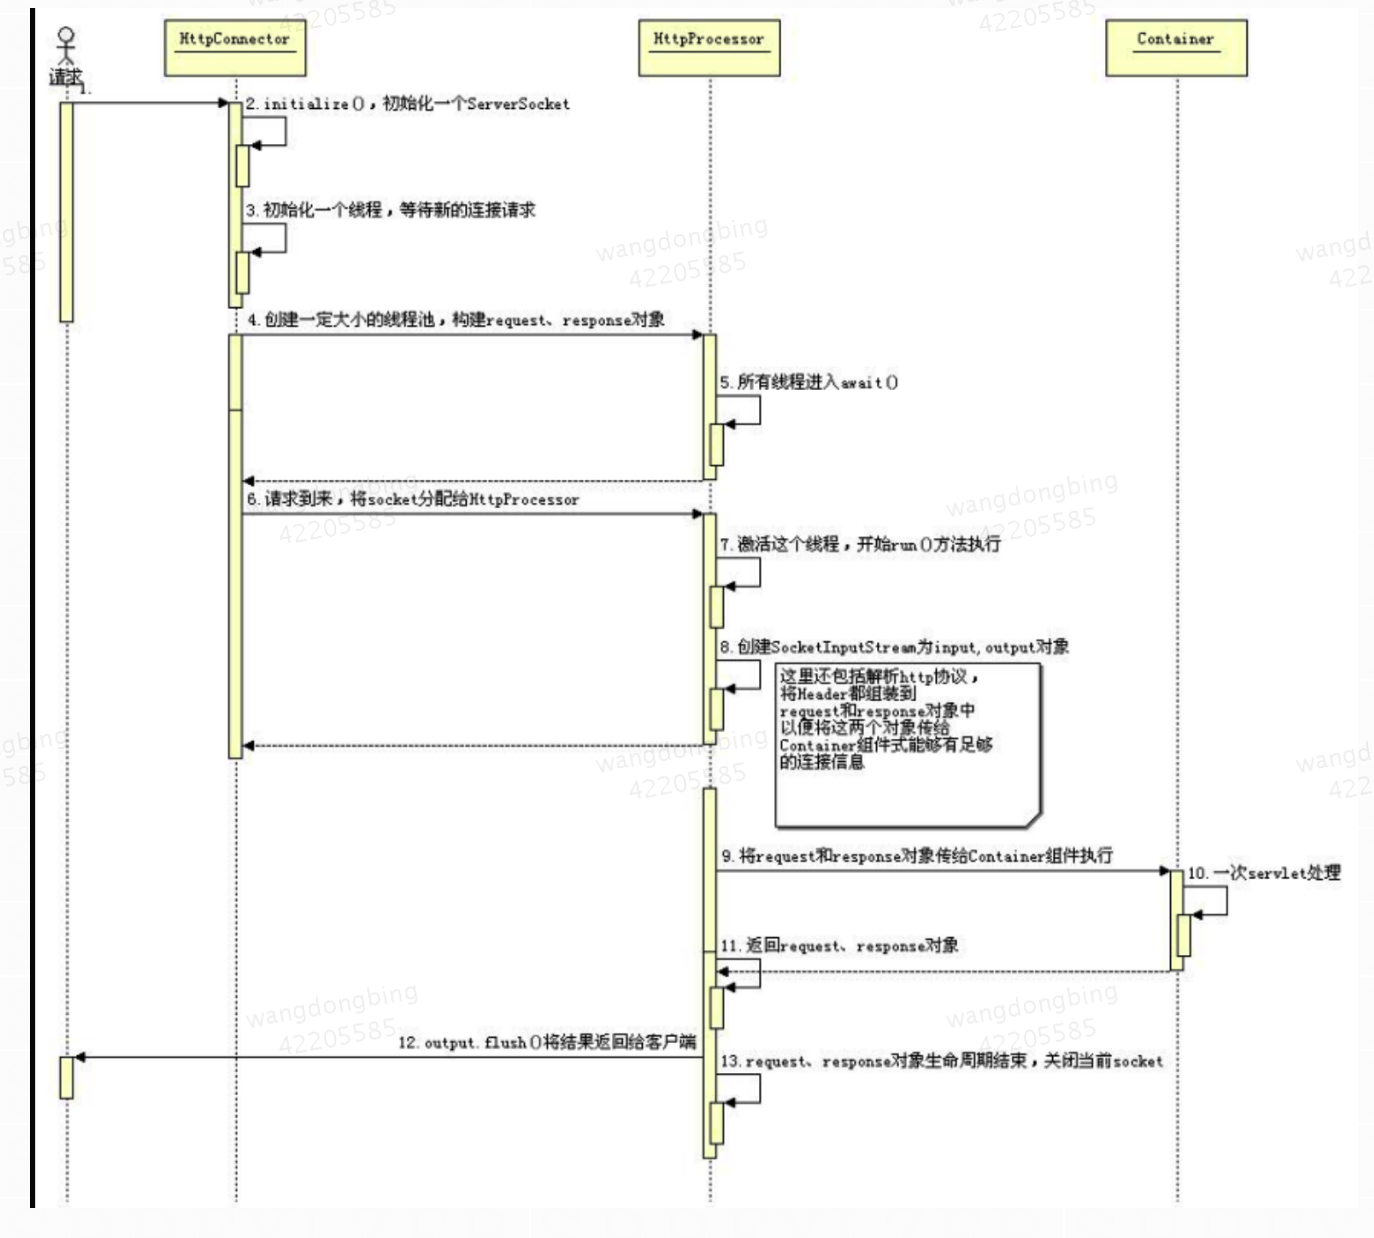
Tomcat 中默认的 Connector 是 Coyote框架,这个 Connector 是可以选择替换的。Connector 最重要的功能就是接收连接请求然后分配线程让 Container 来处理这个请求,所以这必然是多线程的, Connector 划分成 Processor、Protocol, 另外 Coyote 也定义自己的 Request 和 Response 对象。
先看一下 Connector 的主要类图: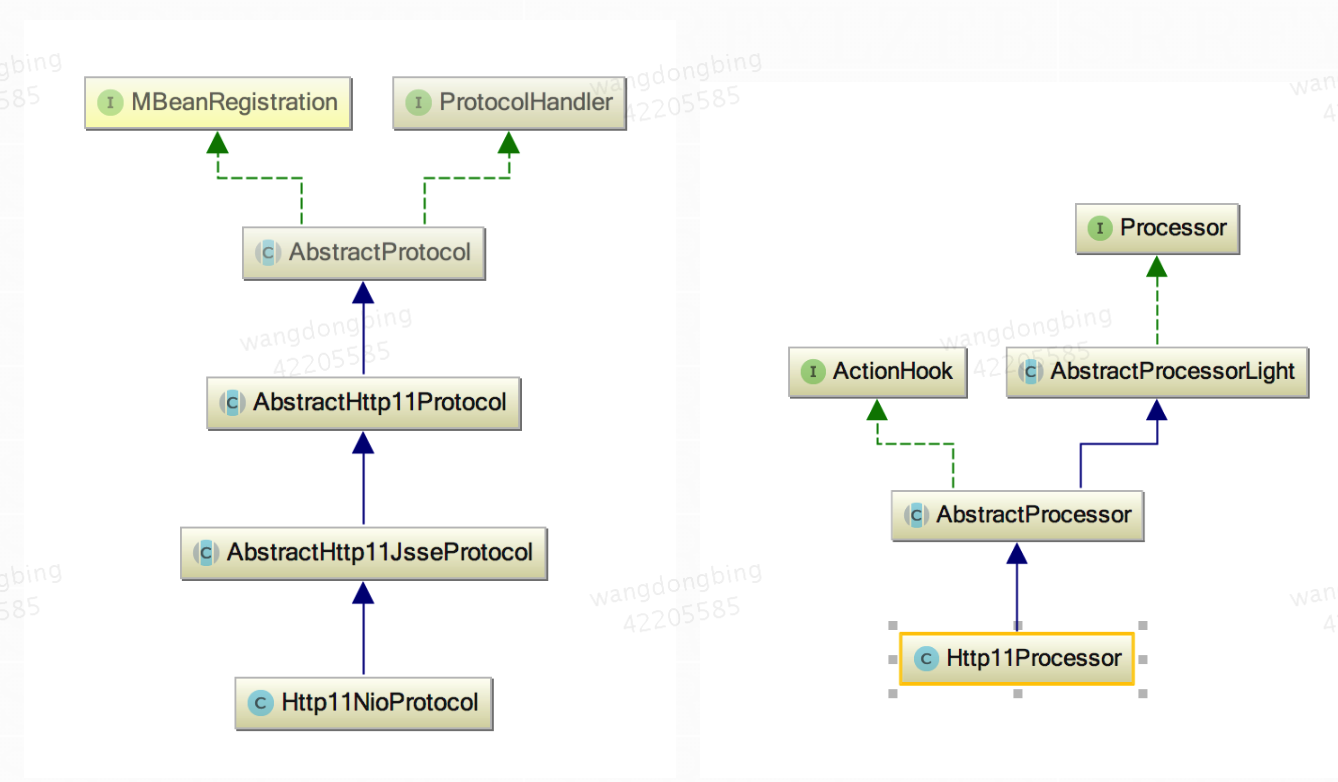
ProtocolHandler start1
2
3
4
5
6
7
8
9
10
11
12
13
14
15
16public void start() throws Exception {
if (getLog().isInfoEnabled()) {
getLog().info(sm.getString("abstractProtocolHandler.start", getName()));
}
endpoint.start();
// Start async timeout thread
asyncTimeout = new AsyncTimeout();
Thread timeoutThread = new Thread(asyncTimeout, getNameInternal() + "-AsyncTimeout");
int priority = endpoint.getThreadPriority();
if (priority < Thread.MIN_PRIORITY || priority > Thread.MAX_PRIORITY) {
priority = Thread.NORM_PRIORITY;
}
timeoutThread.setPriority(priority);
timeoutThread.setDaemon(true);
timeoutThread.start();
}
timeoutThread.start()执行就会进入等待请求的状态,直到一个新的请求到来才会激活它继续执行,当有新的请求进来的时候NioEndpoint回调用ProtocolHandler的process方法
NioEndpoint 的init方法:1
2
3
4
5
6
7protected void initServerSocket() throws Exception {
serverSock = ServerSocketChannel.open();
socketProperties.setProperties(serverSock.socket());
InetSocketAddress addr = (getAddress()!=null?new InetSocketAddress(getAddress(),getPort()):new InetSocketAddress(getPort()));
serverSock.socket().bind(addr,getAcceptCount());
serverSock.configureBlocking(true); //mimic APR behavior
}
Processor组件提供了对协议通信的处理,包括对套接字的读取过滤、对协议的解析并封装成请求对象、响应对象的生成、套接字的过滤写入等等操作!
当 Connector 将 socket 连接封装成 request 和 response 对象后接下来的事情就交给 Container 来处理了。
Container
Container 是容器的父接口,所有子容器都必须实现这个接口,Container 容器的设计用的是典型的责任链的设计模式,它有四个子容器组件构成,分别是:Engine、Host、Context、Wrapper,这四个组件在结构上是平行的,而在逻辑上是父子关系,在处理过程中,Engine 包含 Host,Host 包含 Context,Context 包含 Wrapper。
我们在web项目中的一个Servlet类对应一个Wrapper,多个Servlet就对应多个Wrapper,当有多个Wrapper的时候就需要一个容器来管理这些Wrapper了,这就是Context容器了,Context容器对应一个工程,所以我们新部署一个工程到Tomcat中就会新创建一个Context容器,Context 通常就是对应下面这个配置:
1 | Server.xml |
容器的总体设计
Context 还可以定义在父容器 Host 中,Host 不是必须的,但是要运行 war 程序,就必须要 Host,因为 war 中必有 web.xml 文件,这个文件的解析就需要 Host 了,如果要有多个 Host 就要定义一个 top 容器 Engine 了。而 Engine 没有父容器了,一个 Engine 代表一个完整的 Servlet 引擎。
那么这些容器是如何协同工作的呢?先看一下它们之间的关系图:
四个容器的关系图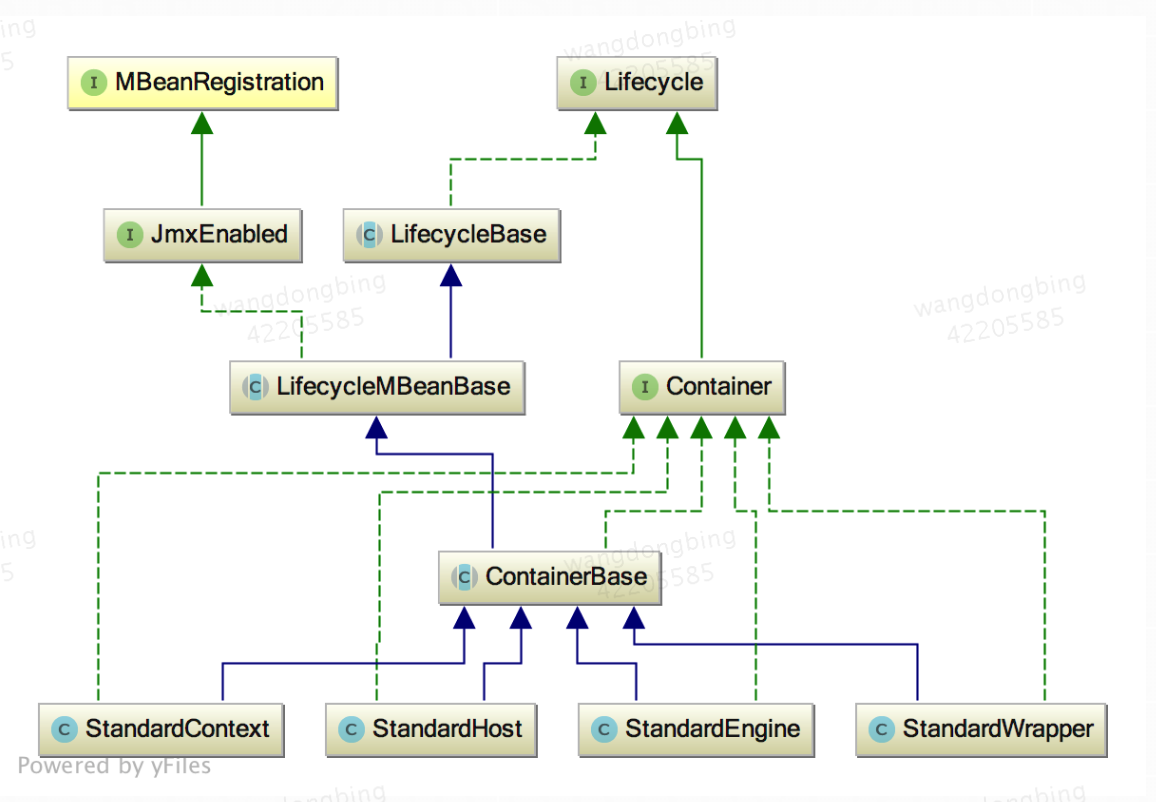
当 Connector 接受到一个连接请求时,将请求交给 Container,Container 是如何处理这个请求的?这四个组件是怎么分工的,怎么把请求传给特定的子容器的呢?又是如何将最终的请求交给 Servlet 处理。下面是这个过程的时序图:
Engine 和 Host 处理请求的时序图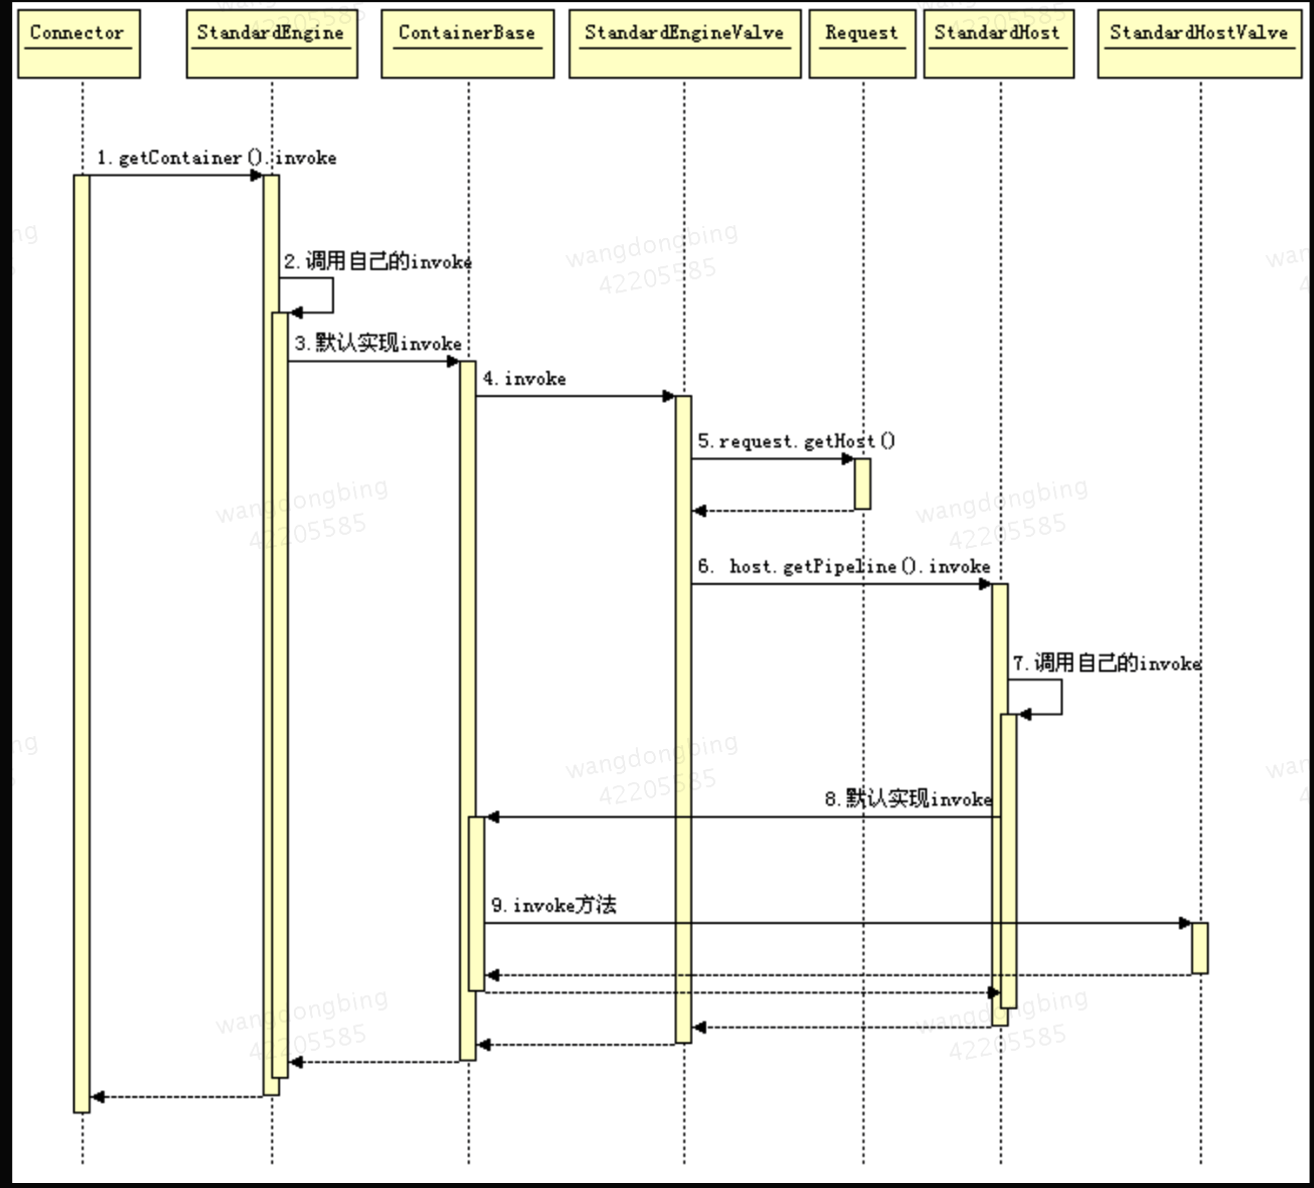
这里看到了 Valve 是不是很熟悉,没错 Valve 的设计在其他框架中也有用的,同样 Pipeline 的原理也基本是相似的,它是一个管道,Engine 和 Host 都会执行这个 Pipeline,您可以在这个管道上增加任意的 Valve,Tomcat 会挨个执行这些 Valve,而且四个组件都会有自己的一套 Valve 集合。您怎么才能定义自己的 Valve 呢?在 server.xml 文件中可以添加,如给 Engine 和 Host 增加一个 Valve 如下:
Server.xml1
2
3
4
5
6
7
8
9
10
11
12
13
14
15
16
17
18
19
20
21
22
23
24
25
26
27
28
29
30
31
32
33
34
35
36
37
38<Engine defaultHost="localhost" name="Catalina">
<Valve className="org.apache.catalina.valves.RequestDumperValve"/>
………
<Host appBase="webapps" autoDeploy="true" name="localhost" unpackWARs="true"
xmlNamespaceAware="false" xmlValidation="false">
<Valve className="org.apache.catalina.valves.FastCommonAccessLogValve"
directory="logs" prefix="localhost_access_log." suffix=".txt"
pattern="common" resolveHosts="false"/>
…………
</Host>
</Engine>
```
StandardEngineValve 和 StandardHostValve 是 Engine 和 Host 的默认的 Valve,它们是最后一个 Valve 负责将请求传给它们的子容器,以继续往下执行。
前面是 Engine 和 Host 容器的请求过程,下面看 Context 和 Wrapper 容器时如何处理请求的。下面是处理请求的时序图:
Context 和 wrapper 的处理请求时序图

从 Tomcat5 开始,子容器的路由放在了 request 中,request 中保存了当前请求正在处理的 Host、Context 和 wrapper。
## Engine 容器
Engine 容器比较简单,它只定义了一些基本的关联关系,其管理的容器是Host,Engine是一个接口,接口类图如下:
Engine 接口的类结构

它的标准实现类是 StandardEngine,这个类注意一点就是 Engine 没有父容器了,如果调用 setParent 方法时将会报错。添加子容器也只能是 Host 类型的,代码如下:
StandardEngine. addChild
``` java
public void addChild(Container child) {
if (!(child instanceof Host))
throw new IllegalArgumentException
(sm.getString("standardEngine.notHost"));
super.addChild(child);
}
public void setParent(Container container) {
throw new IllegalArgumentException
(sm.getString("standardEngine.notParent"));
}
它的初始化方法也就是初始化和它相关联的组件,以及一些事件的监听。
Host 容器
Host容器是Engine容器的子容器,上面也说到Host是受Engine容器管理的,就是指一个虚拟主机,比如我们在访问具体jsp页面URL中localhost就是一个虚拟主机,其作用是运行多个应用,并对这些应用进行管理,其子容器是Context,而且一个主机还保存了主机的相关信息。Host的标准实现类是StandardHost,其闸门实现是StandardHostValve,下面是StandardHost与StandardHostValve的类结构图
下面是和 Host 相关的类关联图: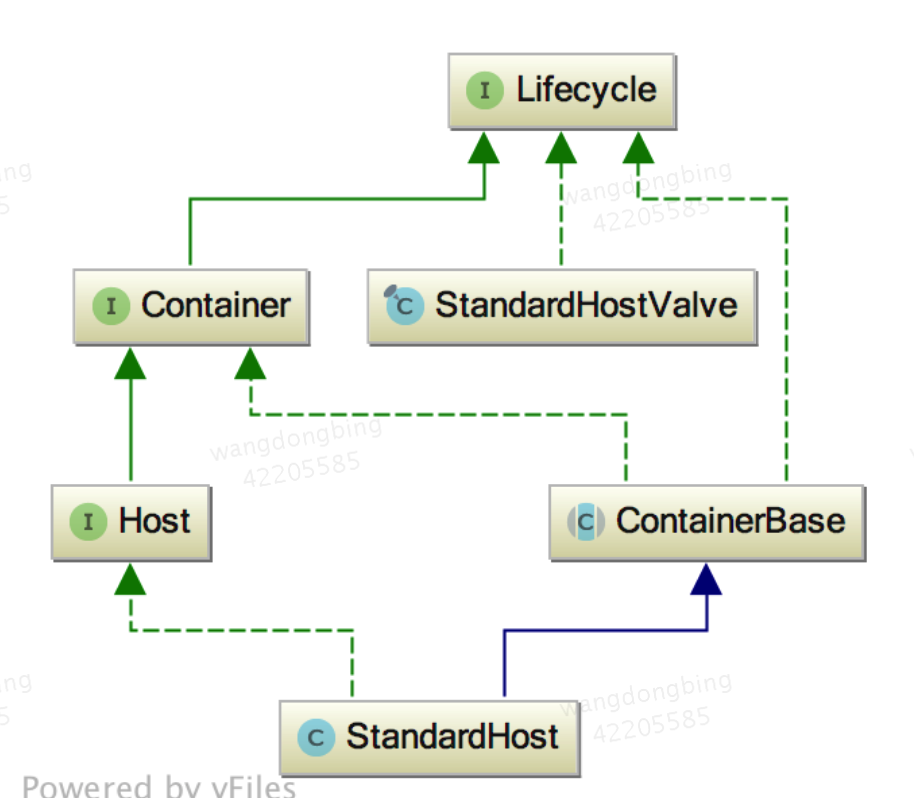
Context 容器
Context容器是一个Web项目的代表,主要管理Servlet实例,在Tomcat中Servlet实例是以Wrapper出现的,Context启动的过程就是加载个类资源文件以及打开子容器以及Pipeline管道的过程。启动Context容器后,就可以处理具体的请求了,具体是通过Request对象。
那么Context调用invoke方法后又发生什么了呢?具体执行的是org.apache.catalina.core.StandardContextValve的invoke方法。相当于进入了Context管道中,要开始通过管道中一个个闸门了。
Context 准备 Servlet 的运行环境是在 Start 方法开始的,这个方法的代码片段如下:
StandardContext.start1
2
3
4
5
6
7
8
9
10
11
12
13
14
15
16
17
18
19
20
21
22
23
24
25
26
27
28
29
30
31
32
33
34
35
36
37
38
39
40
41
42
43
44
45
46
47
48
49
50
51
52
53
54
55
56
57
58
59
60
61public synchronized void start() throws LifecycleException {
………
if( !initialized ) {
try {
init();
} catch( Exception ex ) {
throw new LifecycleException("Error initializaing ", ex);
}
}
………
lifecycle.fireLifecycleEvent(BEFORE_START_EVENT, null);
setAvailable(false);
setConfigured(false);
boolean ok = true;
File configBase = getConfigBase();
if (configBase != null) {
if (getConfigFile() == null) {
File file = new File(configBase, getDefaultConfigFile());
setConfigFile(file.getPath());
try {
File appBaseFile = new File(getAppBase());
if (!appBaseFile.isAbsolute()) {
appBaseFile = new File(engineBase(), getAppBase());
}
String appBase = appBaseFile.getCanonicalPath();
String basePath =
(new File(getBasePath())).getCanonicalPath();
if (!basePath.startsWith(appBase)) {
Server server = ServerFactory.getServer();
((StandardServer) server).storeContext(this);
}
} catch (Exception e) {
log.warn("Error storing config file", e);
}
} else {
try {
String canConfigFile = (new File(getConfigFile())).getCanonicalPath();
if (!canConfigFile.startsWith (configBase.getCanonicalPath())) {
File file = new File(configBase, getDefaultConfigFile());
if (copy(new File(canConfigFile), file)) {
setConfigFile(file.getPath());
}
}
} catch (Exception e) {
log.warn("Error setting config file", e);
}
}
}
………
Container children[] = findChildren();
for (int i = 0; i < children.length; i++) {
if (children[i] instanceof Lifecycle)
((Lifecycle) children[i]).start();
}
if (pipeline instanceof Lifecycle)
((Lifecycle) pipeline).start();
………
}
它主要是设置各种资源属性和管理组件,还有非常重要的就是启动子容器和 Pipeline。
我们知道 Context 的配置文件中有个 reloadable 属性,如下面配置:1
2server.xml
<Context path="/library" docBase="D:\projects\library\deploy\target\library.war" reloadable="true" />
当这个 reloadable 设为 true 时,war 被修改后 Tomcat 会自动的重新加载这个应用。如何做到这点的呢 ? 这个功能是在 StandardContext 的 backgroundProcess 方法中实现的,这个方法的代码如下:
StandardContext. backgroundProcess1
2
3
4
5
6
7
8
9
10
11
12
13
14
15
16
17
18
19
20
21
22
23
24
25
26
27
28
29
30
31
32
33
34
35
36
37
38
39
40
41
42
43
44
45
46public void backgroundProcess() {
if (!getState().isAvailable())
return;
Loader loader = getLoader();
if (loader != null) {
try {
loader.backgroundProcess();
} catch (Exception e) {
log.warn(sm.getString(
"standardContext.backgroundProcess.loader", loader), e);
}
}
Manager manager = getManager();
if (manager != null) {
try {
manager.backgroundProcess();
} catch (Exception e) {
log.warn(sm.getString(
"standardContext.backgroundProcess.manager", manager),
e);
}
}
WebResourceRoot resources = getResources();
if (resources != null) {
try {
resources.backgroundProcess();
} catch (Exception e) {
log.warn(sm.getString(
"standardContext.backgroundProcess.resources",
resources), e);
}
}
InstanceManager instanceManager = getInstanceManager();
if (instanceManager != null) {
try {
instanceManager.backgroundProcess();
} catch (Exception e) {
log.warn(sm.getString(
"standardContext.backgroundProcess.instanceManager",
resources), e);
}
}
super.backgroundProcess();
}
它会调用 reload 方法,而 reload 方法会先调用 stop 方法然后再调用 Start 方法,完成 Context 的一次重新加载。可以看出执行 reload 方法的条件是 reloadable 为 true 和应用被修改,那么这个 backgroundProcess 方法是怎么被调用的呢?
这个方法是在 ContainerBase 类中定义的内部类 ContainerBackgroundProcessor 被周期调用的(1s),这个类是运行在一个后台线程中,它会周期的执行 run 方法,它的 run 方法会周期调用所有容器的 backgroundProcess 方法,因为所有容器都会继承 ContainerBase 类,所以所有容器都能够在 backgroundProcess 方法中定义周期执行的事件。
Wrapper 容器
Wrapper 代表一个 Servlet,它负责管理一个 Servlet,包括的 Servlet 的装载、初始化、执行以及资源回收。Wrapper 是最底层的容器,它没有子容器了,所以调用它的 addChild 将会报错。
Wrapper 的实现类是 StandardWrapper,StandardWrapper 还实现了拥有一个 Servlet 初始化信息的 ServletConfig,由此看出 StandardWrapper 将直接和 Servlet 的各种信息打交道。
下面看一下非常重要的一个方法 loadServlet,如下:1
2
3
4
5
6
7
8
9
10
11
12
13
14
15
16
17
18
19
20
21
22
23
24
25
26
27
28
29
30
31
32
33
34
35
36
37
38
39
40
41
42
43
44
45
46
47
48
49
50
51
52
53
54
55
56
57
58
59
60
61
62
63
64
65
66
67
68
69
70
71
72
73
74
75
76
77
78
79
80
81
82
83
84
85
86
87
88
89
90public synchronized Servlet loadServlet() throws ServletException {
// Nothing to do if we already have an instance or an instance pool
if (!singleThreadModel && (instance != null))
return instance;
PrintStream out = System.out;
if (swallowOutput) {
SystemLogHandler.startCapture();
}
Servlet servlet;
try {
long t1=System.currentTimeMillis();
// Complain if no servlet class has been specified
if (servletClass == null) {
unavailable(null);
throw new ServletException
(sm.getString("standardWrapper.notClass", getName()));
}
InstanceManager instanceManager = ((StandardContext)getParent()).getInstanceManager();
try {
servlet = (Servlet) instanceManager.newInstance(servletClass);
} catch (ClassCastException e) {
unavailable(null);
// Restore the context ClassLoader
throw new ServletException
(sm.getString("standardWrapper.notServlet", servletClass), e);
} catch (Throwable e) {
e = ExceptionUtils.unwrapInvocationTargetException(e);
ExceptionUtils.handleThrowable(e);
unavailable(null);
// Added extra log statement for Bugzilla 36630:
// http://bz.apache.org/bugzilla/show_bug.cgi?id=36630
if(log.isDebugEnabled()) {
log.debug(sm.getString("standardWrapper.instantiate", servletClass), e);
}
// Restore the context ClassLoader
throw new ServletException
(sm.getString("standardWrapper.instantiate", servletClass), e);
}
if (multipartConfigElement == null) {
MultipartConfig annotation =
servlet.getClass().getAnnotation(MultipartConfig.class);
if (annotation != null) {
multipartConfigElement =
new MultipartConfigElement(annotation);
}
}
// Special handling for ContainerServlet instances
// Note: The InstanceManager checks if the application is permitted
// to load ContainerServlets
if (servlet instanceof ContainerServlet) {
((ContainerServlet) servlet).setWrapper(this);
}
classLoadTime=(int) (System.currentTimeMillis() -t1);
if (servlet instanceof SingleThreadModel) {
if (instancePool == null) {
instancePool = new Stack<>();
}
singleThreadModel = true;
}
initServlet(servlet);
fireContainerEvent("load", this);
loadTime=System.currentTimeMillis() -t1;
} finally {
if (swallowOutput) {
String log = SystemLogHandler.stopCapture();
if (log != null && log.length() > 0) {
if (getServletContext() != null) {
getServletContext().log(log);
} else {
out.println(log);
}
}
}
}
return servlet;
}
该类主要负责初始化一个Servlet实例,并调用该实例的init方法,然后通知感兴趣的事件监听程序。
loadServlet()的调用链如下: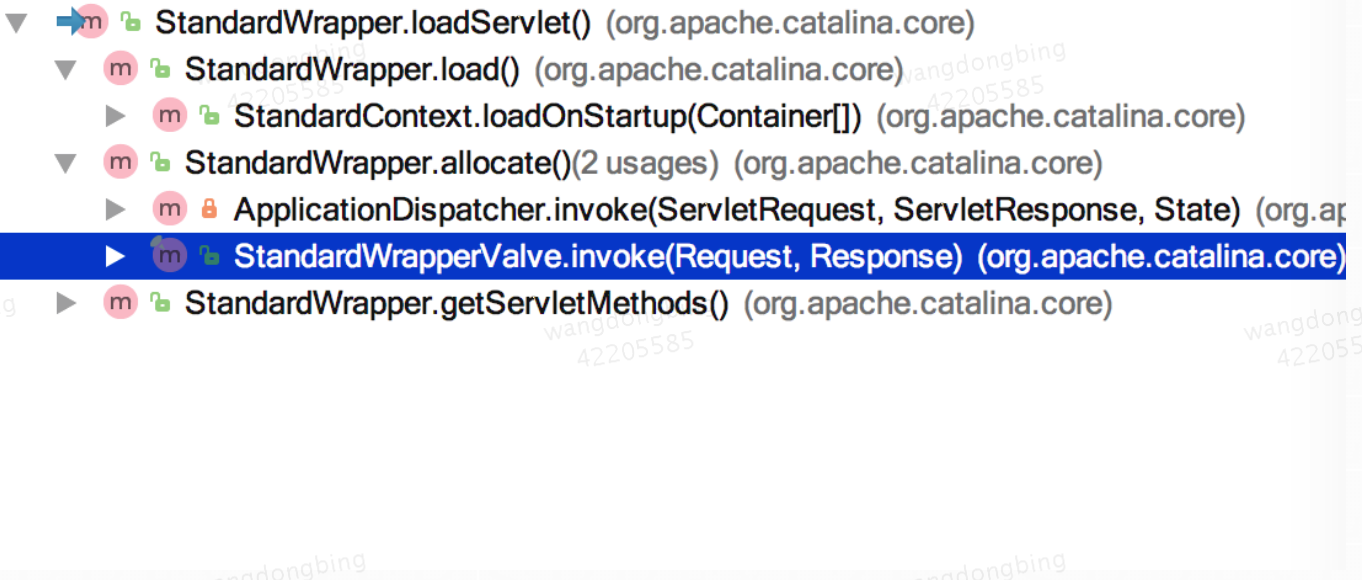
可以看出在调用allocate的loadServlet方法的时候调用了StandardWrapperValve的invoke方法,在Wrapper容器获得请求后,通过allocate方法从实例池栈中弹出一个servlet实例来处理这个请求,servlet实例被封装成filterChain对象,紧接着通过一系列的过滤器过滤到达servlet.service()方法。
invoke方法执行过程:1
2
3
4
5
6
7
8初始化一些本地变量
判断当前应用是否可用,就是判断是否确实有这个项目
分配一个Servlet实例
为请求创建一个过滤器链
过滤器过滤请求
关闭过滤器
重新委派原来委派的Servlet实例
释放资源
coyote框架
AbstractProtocol->AbstractProcessorLight->Http11Processor->CoyoteAdapter
请求流程
启动过程
启动脚本catalina.sh,在catalina.sh中,可以看出tomcat的启动是调用了bootstarp的main方法,main方法中初始化资源,加载class,初始化catlina类,为catlina类set父类加载器parentClassLoader在main方法中有两个很重要的方法,daemon.load(args)和daemon.start(); daemon.load(args)主要还是调用了catalina中的load方法,此方法中负责加载server.xml文件,并通过digester.parse(inputSource)来初始化各个文件,包括很重要的初始化server,service,connector,以及各个contair(host,engine, context,wrap)。然后调用 getServer().init()初始化各个属性和依赖,比如coyote框架。而daemon.start()同样也调用的是catalina的start方法,此方法最重要的就是启动connect,用来监听servlet请求.
请求处理
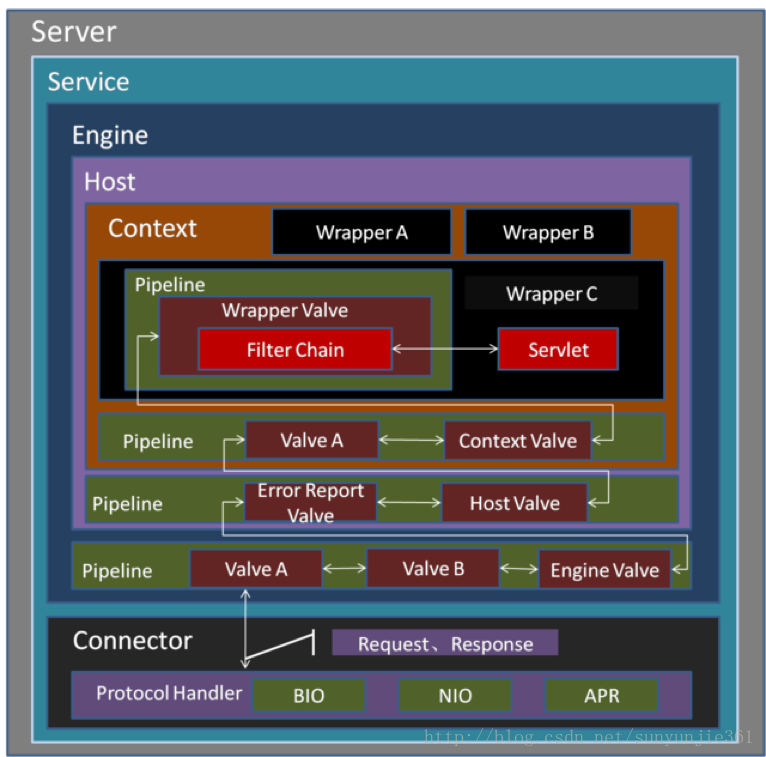
代码描述
1 | Acceptor.run()监听请求,获取socket |
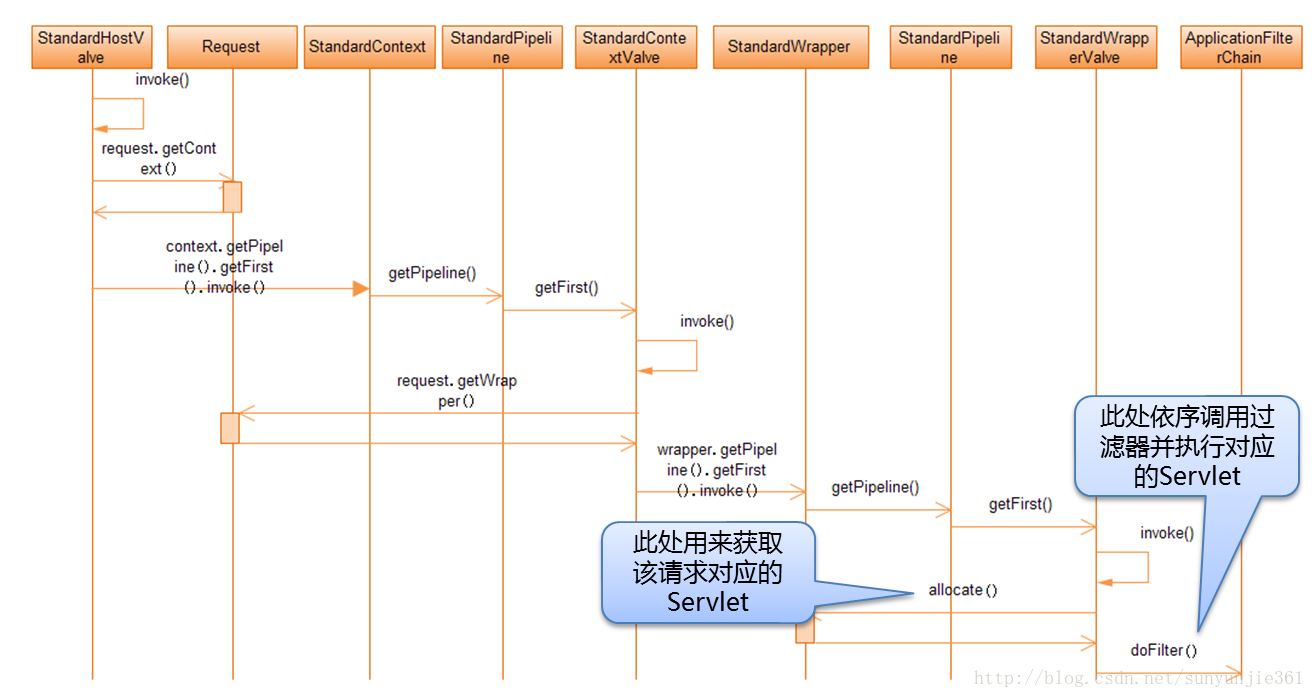
流程描述
1 | 请求被发送到本机端口8080,被在那里侦听的Coyote HTTP/1.1 Connector获得 |